Tuesday, January 28, 2020

Lanai - Day 2

We have come a long way since we first took pictures of Gladys back in 2011.  At that time, the back door lead to a 6 x 8 cement slab which lead to stepping stones amid a mud patch under a leaning, half-dead tree.
In 2011, the Florida Room and garage doors both lead to a
muddy pathway in the back of the house. 
The "ear" tree leaned too close to the house, and the tiny cement
slab outside the doors flooded with each storm.

That same year, we had the leaning "ear" tree removed before it fell on the house.  We put up with the mud and stepping stones for many years. Finally, we had the patio poured in preparation for a future lanai.

When we added the cement slab and the pavers around it,
we planned for our lanai.

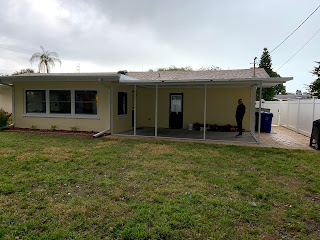
Today, the lanai was completed.  The workmen arrived early, and in the course of the day, they sealed the roof, installed the doors, added flashing to the roof in preparation for gutters tomorrow, caulked every crack in sight, and they screened in the entire enclosure.

One man stands on the roof to seal the roof joints while the other
workman installs the doors.
The door on the far end of the lanai allows
us to access the garbage cans and the side yard.
The side door leads to the back yard.
We have wide overhangs on all sides to protect the lanai from rain,
and the gutters tomorrow will further help keep the lanai dry.

Monday, January 27, 2020

Lanai - Day 1

We have waited a long time to finish all of our remodeling on Gladys.  Last year we felt that we had finally finished all of the interior and exterior work on Gladys.  As a "luxury" item, we started to save for a lanai.

Our return to Florida was delayed due to health concerns, but we have at long last returned to the land of sunshine.  We were only back in town one day when the man from Boyles Aluminum contacted us about coming to measure for our lanai.  Rick had contacted him earlier so he could come over as soon as we returned to the state.  He took some measurements, answered our questions, and sent us a quote which we accepted.

The is the last view of our slab before the lanai installation.

Today was Day 1 of our lanai installation.  The two-man crew arrived about 9:00 a.m.  They unloaded components into our back year and then started to assemble the pre-cut pieces.

The roof panels await installation.

Wall components and the two screen doors are
ready to be assembled.

They built the walls on the lawn, just as one would do with wooden stud walls for a house.  Then up they went.

The workmen work together to install the channels for the roof structure.

Once the walls were complete, the two men started on the roof panels.  The roof is insulated, so even in hot weather, the shaded porch will be cooler than just cooking under a metal or a plastic roof.  Since the panels are insulated, we were able to purchase two with channels in them to accommodate electrical wires.  They will allow us to install both lights as a fan.

The first insulated roof panel goes up.

At the end of this first day, we have the walls up and the roof on.  Of course, today was an overcast day which finally resulted in rain.  That is sad because they were not able to seal the seams in the roof yet, and we have no gutters yet on the new structure.  Both of those components will be added tomorrow.

Rick stands on the covered patio as the rain starts to fall.
The second phase of the enclosure must wait until tomorrow.

Stay tuned for Day 2 when the workmen will seal the roof, add the screens and both screen doors, and  hopefully install the new gutters and downpours before we get more rain.

Sunday, January 12, 2020

It's All in the Details

We have lived with a chaotic dining room cabinet for the past 29 years, and each year I tell myself that I am going to do something to better organize the space.  The dining room cabinet is a "blind corner" cabinet that is blocked off from the rest of the kitchen cabinets by the location of the dishwasher.  It has long been a space to hold good silver, glass serving dishes, trays, tablecloths, placemats, napkins, and kitchen towels.

As the list indicates, I stored a great many items in that single cabinet, and those items always were piled on top of each other.  The cabinet had one shelf, and if I wanted an item in the back of the bottom shelf, I literally had to get down on my hands and knees and burrow into the mess like a gopher retreating into his underground burrow.

As I age, I realized that this gopher act was not going to be possible for much longer.  So I asked Rick to change this one last cabinet so that it would have what all of the other cabinets in my kitchen have: pull-out shelves.
This large cabinet needed organizational help!

He had to work around an electrical outlet deep in the cabinet that supplies power to my dishwasher, and he had to add a frame so that the shelves could slide out past the opening for the door.  He did a spectacular job of working around both of those problems.

Rick attaches the drawer slides to the cabinet frame.

Rick had to borrow from my gopher act in order to attach the frame for the drawer slide-outs.

The drawers themselves gave us a bit of trouble, but in the end, all is well.

I rearranged the cabinet so that the glass serving pieces are stored more conveniently in my kitchen cabinets.  The good silver also was moved to storage elsewhere since I rarely use it.

The top shelf.

Now I have a top shelf that holds aprons, baking linens, and kitchen towels.

The middle shelf.

The second shelf holds placemats and table linens.

The bottom shelf.

The bottom shelf accommodates those big serving trays that most cupboards have no room to hold.

An organized cabinet at last!

The result is that now I can easily find clean kitchen towels when I need one without having to pull out half the cabinet's contents to find what I need.  Rick did a great job, and the cabinet is both more organized and easier to use.